[Editor]
The place where you enter diary entries is called the editor.
You can draw text or pictures here and finally click the SAVE button to save the article.
Even if you close the application while editing, the content will be saved, so you don't necessarily have to save before exiting,
but be sure to save when you're done writing so that it will appear on the timeline.
Drag and drop an image file into the editor to insert the image at that location.
Currently, the supported image extensions are as follows:
png / apng / bmp / gif / jpg / jpeg / jpe / jfif / svg / ico / cur / webp / avif
[Text Marker]
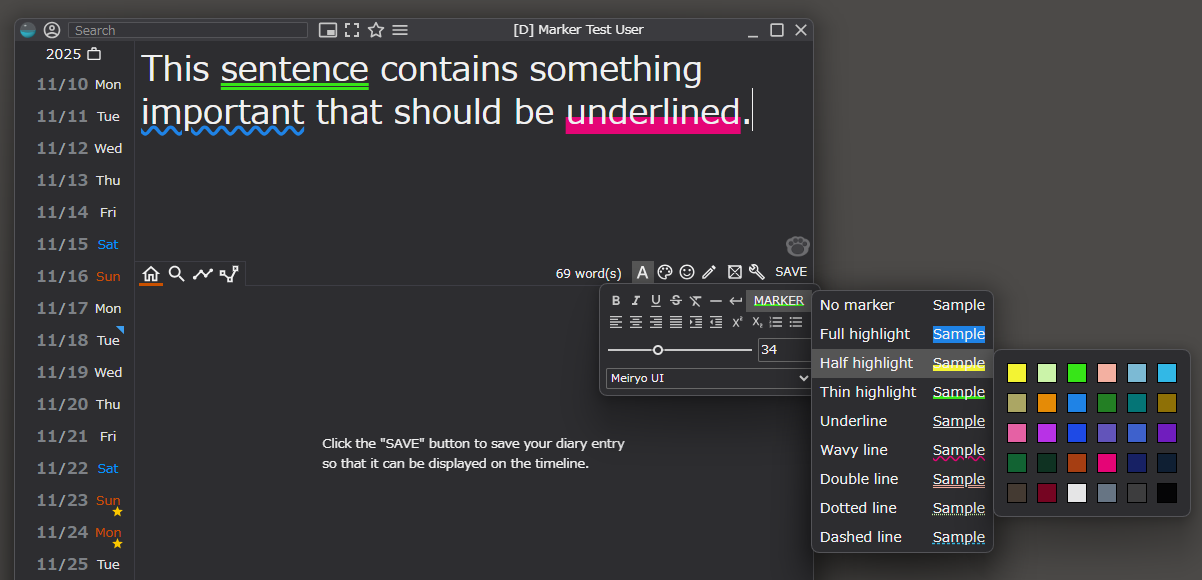
You can underline the text.
Underline / Wavy line / Thick line like highlighter etc.
 Click to enlarge
[Text Effects]
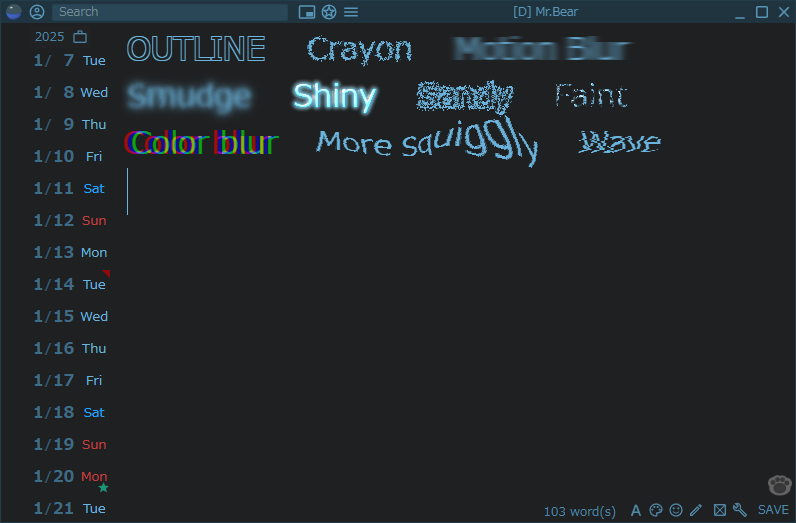
With text selected, you can select text effects from the right-click menu.
Even though an effect has been applied, it is not an image, so it can still be treated as text.
Of course, it will also be searchable.
 Click to enlarge
[Special Effects]
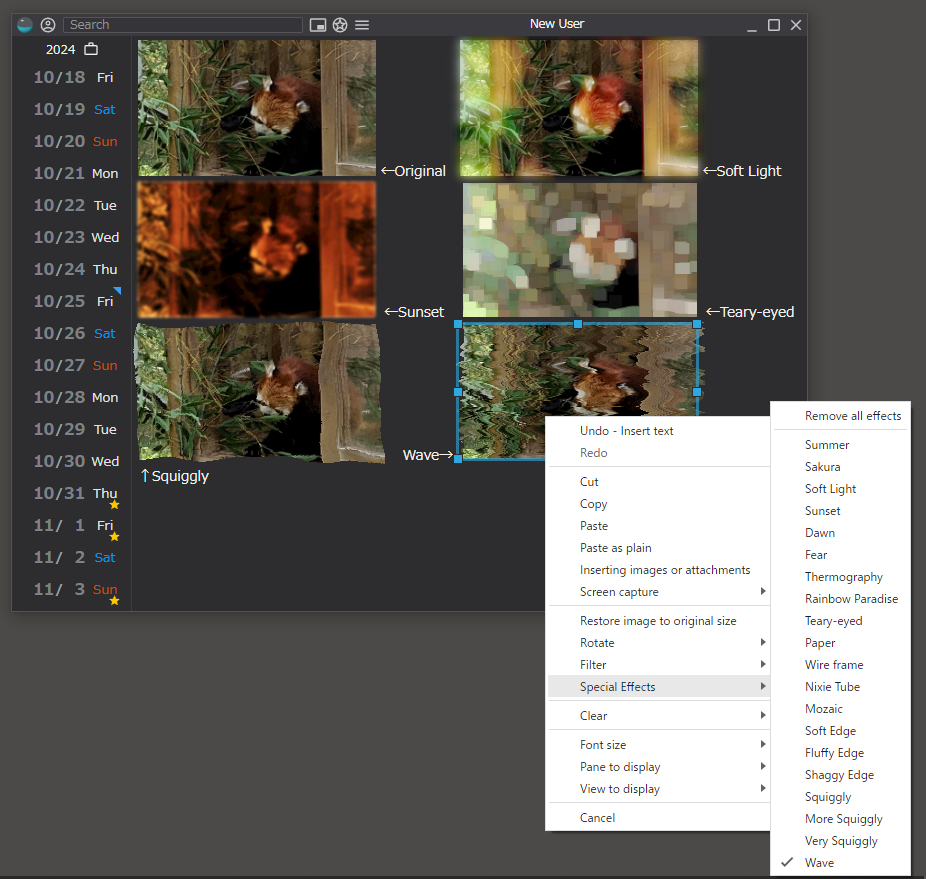
In addition to applying filters that blur or change the brightness of your images,
you can also apply powerful special effects to your images.
Filters and effects can be layered to achieve a variety of image effects.
 Click to enlarge
[Editor toolbar]
[Article color]
Each article can have a unique color
Of course, you can choose it yourself each time,
but if you don't choose a color, it has a function that automatically chooses the color for you.
The colors are simply determined based on words that are often used in the text,
but if you don't want to choose a color every time, I think it's better to leave it to automatic color.
However, please note that the perfect color may not always come out.
If an image or drawing is included, the color will be extracted from that.
The order of priority is Drawing > Image > Text.
[Tag]
If you put a # in front of a string, it will be treated as a tag.
Example) #KittenRecord #Dinner #PC
Tags are meant to make it easier to search. They are just strings in the editor,
but when displayed on the timeline, they are automatically displayed like links and can be searched just by clicking.
Please be sure to leave a space after the string (except at the end of the sentence).
Conversely, you cannot include spaces in tags, so please use _ instead of spaces.
[Property]
Properties are like extended data attached to a diary, such as weight or weather,
and if you enter them, they can be conveniently searched later, or (if they are numerical values) they can be displayed in a graph.
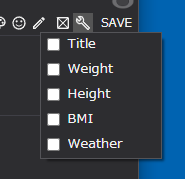
For example, if you want to enter weight, click the properties button.
Then an input item called weight will be displayed at the current position in the editor.
All you have to do is enter your weight number there.
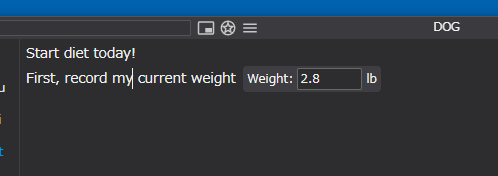
Once saved, it will be displayed as weight on the timeline.
When you click this property, articles with the same value as this weight will be displayed in the search results.
You can also search for values greater than (or less than) this value.For details, see About search.

It is possible to add new properties by setting properties, but it is a little difficult to understand, so we do not recommend it.
[Embed files]
You can embed text files or program source code files into your text by dragging and dropping them.
However, there is no editing function, you can only view it.
Also, currently you can only embed up to 10MB per file.
This is just the current situation, so there is a possibility that the number will increase in the future.
The supported file extensions are as follows:
| Extension | File type | Color coding | HTML display | Markdown display |
|---|---|---|---|---|
| txt / log | Text file | No | No | No |
| ini / cfg / conf | Configuration file | Yes | No | No |
| toml | TOML file | Yes | No | No |
| mk | Makefile | Yes | No | No |
| cmake | CMake Project file | Yes | No | No |
| html / htm / xhtml | HTML file | Yes | Yes | No |
| http / rest | http file | Yes | No | No |
| xml / xsl / xsd / rss / xaml / manifest | XML file | Yes | No | No |
| yaml | YAML file | Yes | No | No |
| json | JSON file | Yes | No | No |
| md / markdown | Markdown file | Yes | No | Yes |
| js / mjs / cjs | JavaScript file | Yes | No | No |
| ts / tsx | TypeScript file | Yes | No | No |
| jsx | JavaScript XML | Yes | No | No |
| vue | Vue file | Yes | No | No |
| css | CSS file | Yes | No | No |
| scss | SCSS file | Yes | No | No |
| sass | SASS file | Yes | No | No |
| less | LESS file | Yes | No | No |
| c / h | C Language file | Yes | No | No |
| cpp / cxx / cc / hpp / hxx | C++ file | Yes | No | No |
| cs | C# file | Yes | No | No |
| java | Java file | Yes | No | No |
| py | Python file | Yes | No | No |
| rb | Ruby file | Yes | No | No |
| rs | RUST file | Yes | No | No |
| swift | Swift file | Yes | No | No |
| kt / kts | Kotlin file | Yes | No | No |
| go | GO Language file | Yes | No | No |
| dart | DART file | Yes | No | No |
| m / mm / h | Objective-C file | Yes | No | No |
| r | R Language file | Yes | No | No |
| scala | Scala file | Yes | No | No |
| vb | VB.Net file | Yes | No | No |
| lua | Lua file | Yes | No | No |
| psl / psml | PowerShell file | Yes | No | No |
| sh / bash / zsh | Bash file | Yes | No | No |
| hs | Haskell file | Yes | No | No |
| lisp / cl / el | Lisp file | Yes | No | No |
| pro / pl | Prolog file | Yes | No | No |
| fs / fsx / fsi | F# file | Yes | No | No |
| php / phtml / php3 | PHP file | Yes | No | No |
| cgi | CGI file | Yes | No | No |
| pl / pm | Perl file | Yes | No | No |
| 1c | 1C file | Yes | No | No |
| abnf | ABNF file | Yes | No | No |
| as | ActionScript file | Yes | No | No |
| ada | ADA file | Yes | No | No |
| conf / htaccess | Apache file | Yes | No | No |
| applescript | AppleScript file | Yes | No | No |
| ino | Arduino file | Yes | No | No |
| s / asm | armasm file | Yes | No | No |
| coffee | CoffeeScript file | Yes | No | No |
| pas | Delphi file | Yes | No | No |
| diff / patch | Diff file | Yes | No | No |
| ex / exs | Elixir file | Yes | No | No |
| elm | Office Theme file | Yes | No | No |
| erl | Erlang file | Yes | No | No |
| f / for / f90 | Fortran file | Yes | No | No |
| feature | Gherkin file | Yes | No | No |
| graphql / gql | GraphQL file | Yes | No | No |
| groovy / gvy | Groovy file | Yes | No | No |
| jl | Julia file | Yes | No | No |
| tex / ltx | LaTeX file | Yes | No | No |
| m | MATLAB file | Yes | No | No |
| conf | Nginx file | Yes | No | No |
| nim | Nim file | Yes | No | No |
| ml / mli | OCaml file | Yes | No | No |
| scm | Scheme file | Yes | No | No |
| sql | SQL file | Yes | No | No |
| pls / plpgsql | PostgreSQL file | Yes | No | No |
| v / vh | Verilog file | Yes | No | No |
| vhdl / vhd | VHDL file | Yes | No | No |
| vim | Vim file | Yes | No | No |
[Attachment]
You can also attach any file apart from images.
However, we currently only allow attachments of up to 200MB per file.
This is for now, so there is a possibility that it will increase in the future.
To select an attachment, drag and drop the file into the editor,
or select Insert Image or Attachment from the right-click menu and select the file.
Last updated: 11/23/2025(Sun)
